
Punch and Taper Surface Piercing
It’s rare these days to see new innovations in the field of body piercing. It’s been almost a decade since piercers like Jon Cobb, Tom Brazda, and Steve Haworth pioneered procedures like the surface bar, pocketing, and the transscrotal, and while things have certainly been improved and fine-tuned since then, not a lot has changed when it comes down to it. However, over the past few years, a number of artists have been working out a new method of surface piercing which promises even better results than are possible using traditionally placed surface bars. This new procedure is called “punch and taper” or “transdermally implanted” surface piercing. It is similar to surface bar piercing, and in fact uses surface bars as jewelry most of the time, but in an effort to reduce trauma and pressure (and thus migration) the entry and exit points are formed with a dermal punch and the “tunnel” for the jewelry is formed with a taper or elevator. The end result is a surface piercing that heals faster and has a far greater survivability rate than a standard clamp and needle type procedure. I recently had a chance to talk to three piercers, each that can make the claim of having independently invented this method. They were kind enough to talk to me both about the procedure itself and the development that went into creating it, giving a rare insight to the technical “craft” element of body piercing as it advances. Before we begin I’d like to introduce them to you, and make one thing very, very clear:
|
||||||||||||||||||||||||||||


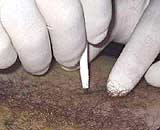
After prepping the skin and marking, I pinch the skin up with my thumb and index finger, and twist a 1.5mm biopsy punch down into the dermis and straight into the subcutaneous tissue — generally that’s 2 to 5mm, 2mm being thin skin like temples and inner wrists, and 5mm being areas like the back. These aren’t just standards though — you need to pinch up the skin before punching so you can make it much easier to tell when you’ve reached the subcutaneous layer.
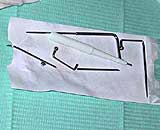
After I’ve removed that small cylinder of dermis, I insert my elevating tool straight down into the hole and shift it so it’s parallel with the skin. I slowly work my way across the subdermis at the same depth as the lifts on the jewelry I’m putting it. The tool I use for the elevation is 6mm bar stock with about two inches of one end milled down to about 2mm width. It’s sturdy and and the ease of using the handle allows me more control and requires less pressure than a taper pin, especially in harder to separate areas like the nape. The consistent flattened shape of the tool tip keeps the pocket tight and uniform so the jewelry sits firmly.
I then insert a small 12ga steel rod that’s round on one end and externally threaded on the other into the pocket as if I’m doing an implant. To make sure the tunnel doesn’t arc up into the dermis, I poke the end of a 12ga taper down into the exit hole and match it up with the end of the rod and follow the rod back out that exit hole. So at this point it looks like a surface piercing with a straight bar in it.
Since I bend all my own pieces, I use step-down external threading on my jewelry. I’ve tried bending internally threaded jewelry but it tends to buckle and break. To keep from pulling threading through the fresh piercing I us a tiny 1/2″ piece of Tygon tubing to attach the surface bar to the 12ga rod. The rod then pulls the jewelry into the piercing in one smooth motion and is removed. The entire thing from punching to putting on the beads takes just a few minutes.
 |
 |
 |
 |
 |
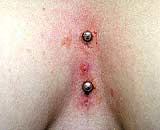 |
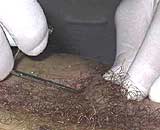
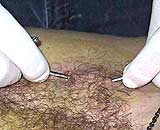
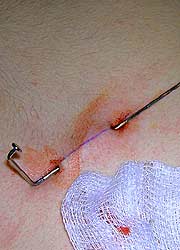
Above: Punch and taper procedure by Brian Decker |
| ZAK: | Assuming we’ve already talked about everything, I start with explaining again why and what materials I’m using, tell them about sterile technique, and the exact process I’m about to use. We also go over their daily activities and lifestyle again to be as sure as possible that nothing will clash with the piercing they want. We determine the perfect jewelry for them after examining the local anatomy in terms of rise and bar length.
Once all that is settled everything goes in the StatIM autoclave. While we’re waiting for that a gross decontamination scrub is done and all the marking is taken care of. The StatIM cassette is opened, hands are scrubbed with Technicare, rinsed, dried, and then misted with Vionexus. I put on my first pair of sterile gloves, and using a sterile 4×4 of Nugauze that is saturated with Technicare I prep the area. These gloves are then disposed of and I put on a new sterile pair. I massage the tissue, doing a non-invasive dissection, to make dermal elevation easier and less traumatic. With a 1.5mm biopsy punch the exits of the wound channel are incised and removed. I use a four inch long threaded taper and insert it into the entry point and elevate the channel being created across the length of the piercing. When the taper reaches the exit hole I massage the tissue to help the taper exit. After that, all that’s left is threading a titanium surface bar onto the taper and feeding it through the channel. I use disc ends for beads, clean the area, and apply a Tegaderm patch to keep the wound from being exposed to outside elements during the first stages of healing. |
| BME: | What sort of aftercare do you recommend to people? |
| ZAK: | In a perfect world I’d suggest dry wound care, but since we don’t live in a perfect work I try to get people just to do as close to dry wound care as they can. |
| TOM: | Just leave it alone as best as you can. If you bump it or it comes in contact with something unclean, clean it with saline immediately. It should be washed daily — gently — and given a couple sea salt soaks for a few minutes, or longer if it gets irritated. Most of all though people need to be aware of their surroundings and prevent problems rather than treating them. Lastly, good health! A healing piercing needs proper resources — nutrients — to be able to heal, and your immune system has to be strong. It doesn’t just happen on its own. |
| BRIAN: | From my point of view, the most important part of the aftercare for surface “piercings” are the warm or hot water soaks which help soften crusting and drain bacteria from the inside of the pocket. The average body piercing is through less than half an inch of tissue, but surface piercings are usually much longer, making it harder for your body to excrete harmful bacteria and dead tissue from inside it. The warm soaks will also increase blood circulation, and your body needs these white blood cells to heal the piercing, just like any wound.
The only antiseptic I recommend for healing is natural sea salts — four teaspoons in a gallon of water, which can then be microwaved to heat it. If you measure this correctly it will match your body’s salinity. Soaps usually have colorings, perfumes, glycerins, triclosan and so on — chemicals that are too strong and can damage and destroy healing tissue. Even for people whose bodies are strong enough to heal with these soaps, healing without them will probably be quicker since your body won’t be spending time fighting off the things that are in the soap! |
| BME: | If they take care of it, how long does healing take, and what sort of success rates can they expect? |
| BRIAN: | I think with “perfect” care, complete healing can be quicker than a standard navel or nipple, depending on the placement. Areas with little movement tend to heal in four to six months assuming they’re not banged up. The sad thing is, most people don’t take perfect care of their piercings, so healing times are often longer than they need to be. The success rate I’ve been getting is very good though — exponentially higher than with needle piercing. |
| ZAK: | I think the majority of healing takes place in the first three months, but I agree that the complete healing is closer to six months. As to the success rate, nothing is 100%, but in the time I’ve been working with this method I haven’t seen any of the pitfalls and problems traditionally associated with surface piercings — no scarring, no rejection, no wound drainage problems, and so on. I’ve even seen them take substantial abuse and other than temporary swelling and a bit of bleeding, they tend to return to normal and don’t show long term effects of that trauma. |
| TOM: | I’m seeing them healing in no more than three months, personally, but with a surface piercing aftercare is for life. Success of the piercing involves a lot of factors — sometimes it can come down to a choice between lifestyle and a piercing. Enough damage to a well healed surface piercing can cause migration at any time. I tell people that a surface piercing is not permanent in that somewhere down the road it will probably need to come out. Of all the ones I’ve done I’ve only seen one reject though, but I only do the ones I think are going to be successful. |
| ZAK: | I’ve done quite a few of these as well, to the point where I’ve stopped keeping track of the numbers. Initially I had everyone coming back in weekly so I could keep an eye on them, but all I ever saw was immaculate results… It was actually funny to see people coming in with Tegaterm tan lines around the piercing months later.
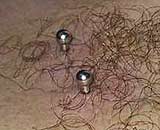
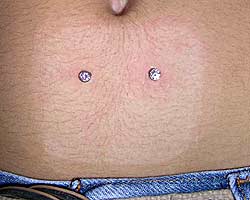
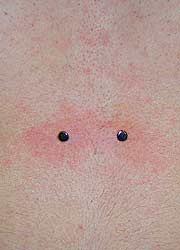
Above: Punch and taper work by Zachary Zito |
| BME: | How did your surface piercing technique evolve over time, and how did you come upon this particular technique? |
| BRIAN: | I adopted the idea from doing transdermal implants — which is why I call them “transdermally implanted surface bars”. When I first started doing them, I was using a #11 scalpel blade to make incisions into the skin. Why I didn’t think to use a dermal punch is beyond me, but after talking to Tom a few years after doing them exclusively with a scalpel I switched. Another one of Tom’s incredible ideas that I’ve adopted is milling down the bottoms of all my bars for a while now, in order to lessen the chance of the jewelry “rolling” over. It’s worked wonders. |
| TOM: | I think about nine years ago we actually talked about it after looking at pictures of Jon Cobb’s wrist piercing, an 8ga straight bar going from one edge of the wrist to the other. Looking at that all I could think about was how much damage the needle could do traveling across all that tissue and blood vessels. At the time I thought about making two scalpel cuts and tapering across the holes. The idea stayed in my head, but I didn’t think that such a long bar across the wrist was a good idea anyway so I didn’t try that.
At about that time we stopped using curved barbells for surface piercing and developed the surface bar. After refining the surface bar I looked at the tissue that I was going to pierce in order to anticipate potential problems and work around them. Later came the use of flat wire bars, which makes a big difference if you’re working with thinner tissue. Down the road you always find those things that you wish you could do but are limited by your process. How do you pierce a person with tissue you can’t even grab? Or a piercing so short that you know it’ll reject quickly? Thinking about these problems brought me back to the old idea from Jon’s wrist piercing. It took me a while before I found someone who’d let me do a piercing that would be a good proof of concept. If you’re doing it on a spot that would have been easy to pierce with a normal surface bar technique it wouldn’t have proved anything. Once I did this, I wanted to get around another problem in surface piercing, and that’s getting a proper entry through the skin, going straight down, straight across, and then straight up. Before you could only do this by piercing at the exact right spot based on what the tissue did when you clamped it, but otherwise the piercing arced through the tissue placing weird stresses on the jewelry and pushing it upwards, increasing the risk of migration. Even if you got through the dermis and epidermis correctly, you still arced through the subcutaneous tissue, which would be visible as a slight bump in the middle of the piercing. So that’s how using the dermal punches came about, and how I got to the procedure I’m using today. |
| ZAK: | When I started doing surface piercings I was using Teflon and Tygon barbells and placing them with standard piercing needles. Later I switched over to titanium staple bars, but still used needles to place them. When I started to experiment with the idea of using a punch and taper technique rather than a needle, I didn’t know that other people were developing it as well. I was mostly thinking of the shape of the initial wound channels; where the jewelry was sitting on the tissue itself. I thought that using this technique would drastically change things, and the results have been very positive. |
| BME: | What kind of response have you had from other piercers, and — to ask you an uncomfortable question — what would you say to piercers reading this who’d like to start using the technique? |
| ZAK: | All the colleagues that I have shared this with, done demonstrations for, or showed healed results to in person have had nothing but good results themselves with it later. If you want to start doing this, find someone that is experienced and do some shadowing to see what’s involved firsthand. |
| BRIAN: | Pierce yourself or your friends before you pierce customers! It might take some time to learn the feel of the tissue you want to work with since there’s no standard depth for proper separation. If you separate too shallowly, you’ll run into rejection problems. Learn to bend your own jewelry as well so you aren’t forced to wait for custom orders (or compromise and pierce too shallow or too deep). I don’t think this method has any special risks — just the time it takes to do it, maybe five minutes instead of one minute. It’s also a bit messier, as it’s not unusual to strike a small blood vessel with the punch and have to pinch the skin for a minute or two before proceeding with the elevator. It won’t affect the outcome though, but you’ll spend a bit more on gauze maybe! |
| TOM: | This piercing does take more skill and understanding of the anatomy to perform it well. Shit, I think you could say that about all piercings, but if you’re going to do this, talk to other piercers that have tried it before? |
 |
 |
 |
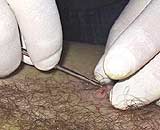
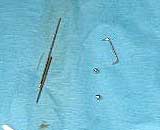
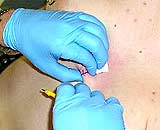
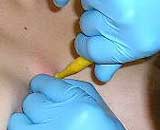
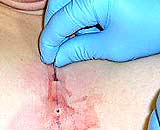
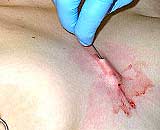
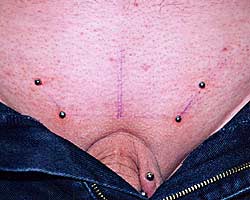
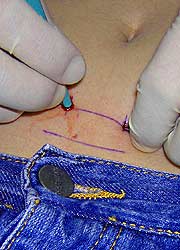
| Above: some of the steps in doing a punch and taper surface piercing (photos and procedure: John Joyce, Scarab Body Arts, Syracuse NY; iam: j_scarab). | ||
 |
I also had a chance to talk to Steve Truitt of Stay Gold Tattoo in Albuquerque, New Mexico, who you may know as stainless on IAM. Steve has been piercing professionally since 1995, and uses a slight variation of this technique for his own surface piercing work. Steve also is an experienced implant and scarification artist, and runs an active suspension group in the Albuquerque area.
| BME: | Tell me about the punch and taper technique that you use? |
| STEVE: | I started off back in 1996 or 1997 using the HTC surface bars, and used those until I tried Tygon in 1999. At the time I was just placing them with a needle, but now I’m using a punch and taper method. Procedurally it’s similar to what Zak, Tom, and Brian are doing — after the cleaning, marking, and so on, I massage the skin for a minute or two to separate the skin from the fascia. Then I dermal punch straight down into my marks. I insert a threaded taper into the first hole and guide it across until it exits the other hole.
That taper is attached to Tygon tubing which I draw through the piercing. I trim the Tygon as needed, and it’s done. It’s a little more bleeding than using a needle, but it has a much higher success rate — probably at least 85% or higher (and I’m doing three or four people a week with this method). |
| BME: | What gave you the idea of switching to using a punch and taper method? |
| STEVE: | I’d tried it a few times over the past five years, but that was using an elevator rather than a taper. I decided it was just too painful and traumatic to do as my normal procedure, but after talking to Zak about how he was doing them, I ordered some punches, tried it, and loved it! |
| BME: | How come you don’t use the metal jewelry like most people are using? |
| STEVE: | Most people find the Tygon is a lot more comfortable to wear. The Tygon does need to be changed occasionally, so I have them come back in the first few months to change it, and then three or four times a year as long as they have the piercing. I can swap in a steel or titanium bar after nine to twelve months, but most people do seem to prefer the Tygon.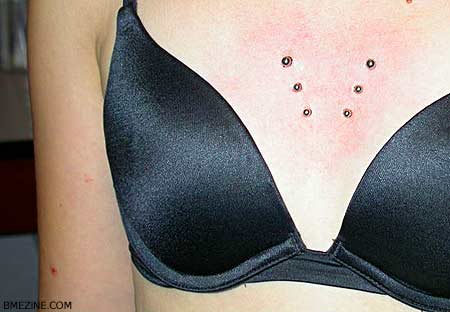 Triple chest piercing by Steve Truitt |
| BME: | Are you seeing about the same healing times? |
| STEVE: | Just switching to punch and taper I saw healing times for surface work drop from six to nine months, down to two or three months in most cases. Even in the harder to heal surface piercings like spinal piercings, they heal in four to six months. |
| BME: | I’ll ask you as well — any advice or warnings to piercers who’d like to start doing this? |
| STEVE: | Learn to swim before you jump in the ocean! I see a lot of “piercers” that are attempting things way out of their league. Take your time, learn how skin works, how the body heals, and get all your basic piercings down before you attempt to move to the more complicated procedures and tools.
The risks of this procedure are minimal in the hands of an experienced piercer, but they’re greatly compounded in the hands of a hack. You have to be a lot more careful looking for veins with this method, since you don’t want to push a dermal punch in and take out a chunk of an artery, nerve, or vein! Other than that, the only negative I can think of is that there are some States that don’t allow piercers to use dermal punches. |
Thank you very much to the piercers above, and as well I’d like to thank Jakk “ScabBoy” Cook (Express Yourself, Lackawanna NY), Matt Bruce (Spitfire Tattoos, Victoria BC), John Joyce (Scarab Body Arts, Syracuse NY), Tony Snow (Bad Apple, Las Vegas NV), Emilio Gonzalez (Wildcat, Antwerp Belgium), and Keru von Borries (La Paz, Bolivia), who all helped in creating this article with supplemental interviews, commentary, and procedural photos.

Shannon Larratt
BME.com
 BME/News and Modblog highlight only a small fraction of what
i live in houston tx and i can not find anybody who does the punch and taper. any ideas? and if i cant find anyone, what is the next best method?
i live in houston tx and i can not find anybody who does the punch and taper. any ideas? and if i cant find anyone, what is the next best method?
I just got a surface bar implanted on top of my left wrist yesterday, about 3/4″ behind the joint. I got it done at a piercing shop in St. Marks Place, NYC and as far as I can tell, the guy used a variation of punch and taper to do it. He marked my wrist over and over to make sure the points were both the exact width of the bar, but instead of using a punch he used a 1.5 mm hollow needle then stretched it to about 4 or 5 mm with a taper behind the needle and then pulled the bar through. Question is to anyone who sees this, what are the chances of my skin not rejecting this piercing assuming I actually take good care of it? For reference its a >1″ square titanium bar with flat plates instead of balls.
I just got a surface bar implanted on top of my left wrist yesterday, about 3/4″ behind the joint. I got it done at a piercing shop in St. Marks Place, NYC and as far as I can tell, the guy used a variation of punch and taper to do it. He marked my wrist over and over to make sure the points were both the exact width of the bar, but instead of using a punch he used a 1.5 mm hollow needle then stretched it to about 4 or 5 mm with a taper behind the needle and then pulled the bar through. Question is to anyone who sees this, what are the chances of my skin not rejecting this piercing assuming I actually take good care of it? For reference its a >1″ square titanium bar with flat plates instead of balls.